How to Build a Gaming PC in 2025: Complete Step-by-Step Guide
Understanding Your Build Budget and Goals
Before purchasing any components, establish a clear budget and define your gaming goals. Entry-level gaming PCs starting around ₹50,000-70,000 handle 1080p gaming at medium-high settings in most modern titles. Mid-range builds in the ₹90,000-1,20,000 range deliver excellent 1440p performance and handle VR gaming comfortably. High-end systems costing ₹1,50,000-2,00,000+ dominate 4K gaming and content creation workloads. Understanding your target resolution and desired frame rates helps determine component allocation within your budget.
Consider which games you'll play most frequently, as different genres have varying hardware demands. Competitive esports titles like Counter-Strike 2, Valorant, and League of Legends prioritize high refresh rates and prefer strong CPUs, while AAA single-player games like Cyberpunk 2077 and Ghost of Yotei demand powerful GPUs for maximum visual fidelity. Content creators should budget extra for additional RAM and faster storage, while pure gamers can focus spending on GPU and display quality.
Essential Components Checklist
1. Central Processing Unit (CPU)
The CPU serves as your PC's brain, handling game logic, physics calculations, AI routines, and system operations. For gaming in 2025, AMD's Ryzen 7 7600X and Ryzen 9 9600X offer exceptional value with strong gaming performance and efficient power consumption. Intel's Core i5-14500H and Core Ultra 7 provide competitive alternatives with excellent single-threaded performance critical for gaming. Budget builds can utilize AMD Ryzen 5 7500F or Intel i3-14100U, while enthusiasts should consider Ryzen 9 9950X or Intel Core i9-14900K for maximum performance.
When selecting CPUs, consider socket compatibility with your motherboard choice, included coolers (if any), and power consumption affecting PSU requirements. Most modern gaming CPUs include 6-8 cores with 12-16 threads, providing ample processing power for current and future games. Avoid overspending on CPUs with excessive core counts, as games rarely utilize beyond 8 cores effectively. Allocate saved budget toward a better graphics card for more immediate gaming benefits.
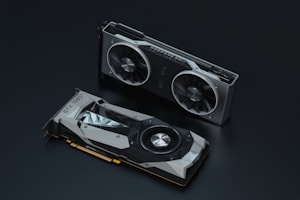
2. Graphics Processing Unit (GPU)
The GPU is your gaming PC's most critical component, directly determining gaming performance and visual quality. Budget around 35-45% of your total build cost for the graphics card. For 1080p gaming, NVIDIA's RTX 4060 (₹32,000-38,000) or AMD's RX 7600 XT (₹28,000-34,000) provide excellent performance. 1440p gamers should target RTX 4070 (₹52,000-60,000) or RX 7800 XT (₹48,000-56,000). 4K gaming demands RTX 4080/4090 (₹1,00,000-1,65,000) or RX 7900 XTX (₹85,000-95,000).
NVIDIA cards excel in ray tracing performance and offer superior DLSS upscaling technology, while AMD cards typically provide better rasterization performance per rupee and larger VRAM buffers beneficial for high-resolution gaming. Consider your preferred games' optimization—titles with strong NVIDIA partnerships run better on GeForce cards, while AMD-sponsored games favor Radeon. Ensure your chosen GPU fits your case physically and that your PSU provides adequate power connectors (typically requiring one or two 8-pin PCIe power cables).
3. Motherboard
Key motherboard features include sufficient RAM slots (4 slots recommended), M.2 NVMe slots for fast storage (minimum 2 slots), robust VRM cooling for stable power delivery, built-in WiFi 6E and Bluetooth 5.2 (if desired), adequate USB ports including USB-C, and quality audio chips. Read reviews focusing on VRM temperature testing, especially if planning CPU overclocking. Budget boards can throttle high-end CPUs under sustained loads, negating performance benefits. Brands like ASUS, MSI, Gigabyte, and ASRock all produce reliable motherboards across various price points.
4. Memory (RAM)
16GB DDR5 RAM represents the minimum for gaming in 2025, with 32GB recommended for enthusiasts and content creators. Purchase RAM in dual-channel kits (2x8GB or 2x16GB) rather than single sticks for doubled bandwidth. DDR5-6000 CL30 kits (₹6,000-10,000 for 32GB) provide optimal performance for AMD Ryzen 7000/9000 CPUs, while DDR5-5600 works well for Intel platforms. Budget builders using older platforms can utilize DDR4-3600 CL16 (₹3,500-6,000 for 32GB), though DDR5 is recommended for new builds.
RGB RAM adds ₹1,000-2,000 premium for aesthetic lighting effects controlled through motherboard software. Non-RGB RAM performs identically at lower cost if aesthetics aren't prioritized. Verify RAM compatibility with your motherboard's QVL (Qualified Vendor List) to ensure rated speeds work properly. Enable XMP/EXPO profiles in BIOS after installation to run RAM at advertised speeds rather than default conservative speeds. Proper RAM configuration significantly impacts gaming performance, with dual-channel operation providing 20-30% improvements over single-channel in many titles.
5. Storage
Every gaming PC needs fast primary storage for the operating system and frequently-played games. M.2 NVMe SSDs using PCIe 4.0 interface provide the best performance, with 1TB drives (₹5,500-8,000) serving as the minimum recommended capacity. Modern games like Starfield, Baldur's Gate 3, and Ghost of Yotei each consume 100GB+ storage. Budget-conscious builders can start with 500GB (₹3,500-5,000) and add storage later, though 1TB provides better cost-per-gigabyte value.
Premium PCIe 5.0 drives like Samsung 990 Pro or WD Black SN850X offer minimal gaming benefits over quality PCIe 4.0 options, making drives like Kingston KC3000, Crucial P5 Plus, or WD Blue SN580 excellent value purchases. For bulk game storage, add a 2TB SATA SSD (₹8,000-11,000) or mechanical hard drive (₹3,500-5,000) as secondary storage. Install your operating system, frequently-played competitive games, and applications on the NVMe drive for fastest loading, relegating large single-player games to secondary storage where slightly slower load times matter less.
6. Power Supply Unit (PSU)

Reputable PSU manufacturers include Corsair, Seasonic, EVGA, Cooler Master, and Thermaltake. Avoid unknown brands with suspiciously low prices, as PSU failures can damage expensive components. Look for 10-year warranties indicating manufacturer confidence. Ensure the PSU includes necessary PCIe power connectors for your GPU—modern high-end cards require multiple 8-pin connectors or new 12VHPWR cables. Buy from PSU tier lists maintained by enthusiast communities to avoid poor-quality units disguised with marketing buzzwords.
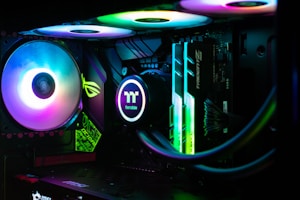
7. PC Case
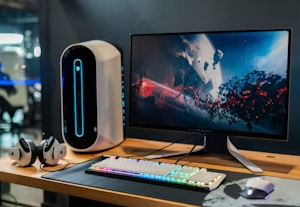
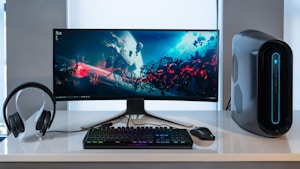
Cases house all components and significantly impact build aesthetics, cooling performance, and assembly ease. Mid-tower cases (₹4,500-10,000) suit most gaming builds, offering good expansion space without excessive footprint. Popular options include Lian Li Lancool 216, Phanteks Eclipse P400A, NZXT H510 Flow, and Corsair 4000D Airflow. Ensure your chosen case supports your motherboard form factor (ATX most common) and GPU length (check specifications carefully—modern GPUs reach 300-350mm).
Good cases feature mesh front panels for airflow, cable management channels behind the motherboard tray, included case fans (2-3 fans minimum), and tempered glass side panels for component visibility. Tool-less installation mechanisms simplify assembly. Consider noise insulation if building in quiet environments, though solid panels typically reduce airflow. USB-C front panel connectivity adds convenience for modern peripherals. Avoid cases with closed-off fronts that choke airflow regardless of appearance—thermals directly impact component longevity and performance.
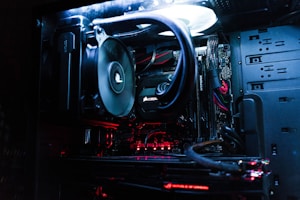
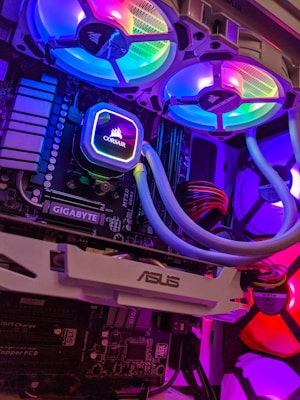
8. CPU Cooler
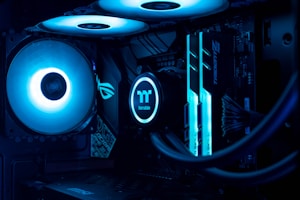
Many CPUs include stock coolers sufficient for basic operation, but aftermarket coolers provide better cooling, lower noise, and aesthetic improvements. Tower air coolers like Deepcool AK400 (₹2,200), Cooler Master Hyper 212 (₹2,800), or Noctua NH-U12S (₹7,000) offer excellent price-to-performance. Budget builds can use stock coolers initially and upgrade later if temperatures concern you. High-end CPUs benefit from premium air coolers or all-in-one (AIO) liquid coolers.
240mm AIO coolers (₹8,000-12,000) provide strong cooling with RGB aesthetics popular for showcase builds. Verify CPU socket compatibility when purchasing coolers, as mounting mechanisms vary between AMD and Intel platforms. Installation difficulty varies significantly—some coolers install easily while others require patience and careful manual reading. Quality thermal paste comes pre-applied on many coolers; if not included, purchase Arctic MX-5 or Thermal Grizzly Kryonaut (₹400-800) separately.
9. Operating System
Windows 11 Home (₹8,000-10,000) remains the standard gaming operating system, offering native support for DirectX 12 Ultimate, DirectStorage for fast game loading, and Auto HDR for enhanced visuals. Windows 11 Pro (₹12,000-15,000) adds business features rarely needed by gamers. Purchase legitimate Windows licenses from authorized retailers or Microsoft directly—cheap "keys" from unauthorized sellers risk deactivation. Students can often obtain free Windows licenses through their educational institutions.
Create a bootable Windows 11 USB drive using Microsoft's Media Creation Tool before building your PC. Some builders use Linux distributions like Ubuntu or Pop!_OS for gaming, leveraging Proton compatibility layer for Windows games. While Linux gaming has improved dramatically, Windows remains recommended for gaming-focused builds due to superior compatibility, performance, and driver support from GPU manufacturers.
Tools and Preparation

Clear a large, flat surface like a dining table for component layout and assembly. Remove any carpeting if possible, as it generates static electricity. Work in well-lit area allowing clear visibility of small components and connectors. Have your smartphone or tablet nearby for consulting build guides and troubleshooting. Keep component boxes organized for potential warranty returns. Ground yourself by touching a metal object before handling components to discharge static electricity that could damage sensitive electronics.
⚠️ Important Safety Reminders
Never force components into place—if something doesn't fit easily, verify correct orientation and alignment. Handle components by edges, avoiding contact with circuitry, pins, and contacts. Keep liquids away from your work area. Discharge static electricity regularly by touching grounded metal surfaces. Read component manuals before installation to understand proper procedures. Take breaks if frustrated rather than forcing components out of impatience.
Step-by-Step PC Assembly Process
Step 1: Prepare the Case
Remove both side panels from your case by unscrewing thumbscrews or releasing quick-release mechanisms. Remove any protective plastic films from tempered glass panels and interior surfaces. Take out included case fans if pre-installed in packaging position. Locate the motherboard standoffs—small brass screws that elevate the motherboard preventing shorts. Most cases come with standoffs pre-installed in ATX configuration; verify they align with your motherboard mounting holes.
Install the I/O shield that came with your motherboard by pressing it into the rectangular cutout at the rear of the case. The shield should click into place with tabs on all four sides. Ensure proper orientation with port labels matching your motherboard's rear I/O panel. The shield has sharp edges—press firmly on edges rather than center to avoid cuts.
Step 2: Install the CPU
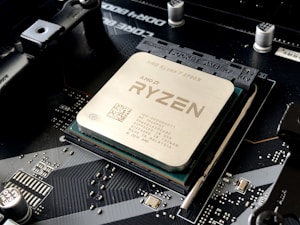
Remove the CPU from its packaging, handling it only by the edges. Never touch the gold contact pins (AMD) or contact pads (Intel) on the bottom. Locate the orientation marker—a golden triangle on AMD CPUs or notches on Intel CPUs. Align the marker with the matching symbol on the socket. Gently lower the CPU straight down into the socket without forcing or angling it. The CPU should sit perfectly flat without any pressure needed.
For AMD systems, the CPU simply sits in the socket. Lower the retention arm back down and hook it under the retention clip—some pressure is normal. For Intel systems, close the retention bracket over the CPU, then press the metal lever down until it hooks under the locking tab. You'll feel resistance as the bracket presses the CPU into the socket—this is normal. The protective plastic cover will pop off automatically when closing the bracket.
💡 Pro Tip: CPU Installation
If the CPU doesn't drop into the socket effortlessly, don't force it. Remove the CPU and check for bent pins (AMD) or debris in the socket. The orientation marker must align perfectly. Taking your time here prevents expensive CPU damage from misalignment or bent pins.
Step 3: Install M.2 SSD (Optional - Recommended Before Cooler)
Most motherboards include M.2 slots for NVMe SSDs, typically located below the CPU socket or between PCIe slots. Consult your motherboard manual to identify M.2 slots—some motherboards include multiple slots with different PCIe generation support. Use the highest-performance slot for your boot drive (usually the top M.2 slot). Remove any protective plastic covers or pre-installed thermal pads from M.2 slots.
Unscrew the small standoff screw at the end of the M.2 slot if present. Some motherboards use tool-free clips instead. Align your M.2 SSD with the slot at a 30-degree angle, with the notch in the SSD matching the key in the slot. Insert the SSD into the slot, pressing firmly until the gold contacts are fully inserted. Lower the SSD flat against the motherboard and secure it with the standoff screw or clip. Don't overtighten—firm pressure is sufficient.
Step 4: Install CPU Cooler
If your cooler doesn't include pre-applied thermal paste, apply a small pea-sized amount to the center of the CPU's heat spreader. Don't spread it—mounting pressure distributes paste evenly. Position the cooler over the CPU, aligning mounting brackets with holes around the socket. Lower the cooler straight down onto the CPU without sliding it sideways. Secure the cooler according to manufacturer instructions—typically screwing down in alternating diagonal pattern (tighten screws incrementally in X pattern for even pressure).
Connect the CPU cooler fan cable to the CPU_FAN header on your motherboard, usually located near the CPU socket. The 4-pin cable only fits one way—align the clip with the header tab. AIO liquid coolers require additional steps: mount the radiator with fans to case intake or exhaust positions, then connect pump power cable to CPU_FAN or dedicated pump header, and fan cables to system fan headers or included controller.
⚠️ Thermal Paste Application
Use only a pea-sized amount of thermal paste—excess paste doesn't improve cooling and can spill over the CPU sides. The "pea method" (single dot in center) works best for most coolers. Never reuse old thermal paste when remounting coolers—clean surfaces with isopropyl alcohol and apply fresh paste.
Step 5: Install Memory (RAM)
Locate the RAM slots on your motherboard, usually positioned to the right of the CPU socket. Consult your motherboard manual for optimal dual-channel configuration—typically slots 2 and 4 (counting from the CPU) for two RAM sticks, though some boards prefer slots 1 and 3. Open the RAM slot clips by pushing them away from the center. Some motherboards have clips on both ends of each slot, while others have one fixed end and one clip.
Remove RAM sticks from packaging, handling them by the edges. Align the notch in the RAM module with the key in the slot—RAM only fits one way. Position the RAM above the slot and press down firmly with even pressure on both ends simultaneously. You'll hear a solid click as the retention clips snap into place, automatically closing to secure the RAM. The clips should be fully closed, flush with the RAM stick sides. If one end isn't secured, press down on that side until it clicks.
Step 6: Install Motherboard into Case

Insert motherboard mounting screws through motherboard holes into standoffs, finger-tightening all screws before fully securing them. This prevents the board from shifting during screw tightening. Use a magnetic screwdriver to avoid dropping screws into the case. Tighten screws in a diagonal pattern (like tightening car wheel lug nuts) for even pressure distribution. Snug screws firmly but don't overtighten—you're threading into brass standoffs that can strip.
Step 7: Connect Case Front Panel Cables
Locate the bundle of thin cables coming from the front of your case. These include power button, reset button, power LED, HDD activity LED, and USB/audio headers. Consult your motherboard manual to identify the front panel header, usually located at the bottom-right edge of the motherboard. The header consists of two rows of pins with specific functions labeled either on the motherboard directly or in the manual.
Connect each cable to corresponding pins: Power switch (PWR_SW), Reset switch (RESET_SW), Power LED (+/-, polarity matters), HDD LED (+/-, polarity matters). Switch connectors work in either orientation, while LED connectors require correct polarity—positive pin goes to the pin marked positive. If LEDs don't light after first boot, simply reverse the connector. Front panel USB 3.0/3.1 connectors are large keyed plugs that only fit the correct header. USB 2.0 uses smaller 9-pin connectors. HD Audio connects to the audio header, usually labeled AUDIO or AAFP.
💡 Pro Tip: Front Panel Connectors
Front panel connectors are the fiddliest part of PC building. Use good lighting and consider using a flashlight to see motherboard pin labels clearly. Some motherboards include a plastic adapter that accepts all front panel connectors, allowing connection as a single block rather than individual pins. Take a photo of the pin layout before connecting for reference.
Step 8: Install Power Supply (PSU)
Most modern cases mount the PSU at the bottom with the fan facing downward (if your case has bottom ventilation) or upward. Position the PSU in the mounting bracket with the power socket and switch facing the rear ventilation opening. Align the PSU's screw holes with the case mounting holes and secure with four screws included with your case or PSU. Ensure the PSU sits flush against the case without gaps.
For modular PSUs, connect cables to the PSU before or after installation based on space access. Required cables include: 24-pin ATX motherboard power (largest cable), 8-pin (4+4) CPU power, PCIe power cables for graphics card (6+2 pin, quantity depends on GPU), SATA power cables for storage drives, and peripheral power (optional, for case fans or RGB controllers). Connect cables to the PSU firmly until they click into place. Semi-modular PSUs have the 24-pin and CPU cables permanently attached.
Step 9: Connect Power Supply Cables
Connect the 8-pin (or 4+4 pin) CPU power cable to the CPU power connector located near the top-left corner of the motherboard (near the CPU). The connector is labeled CPU_PWR or EPS12V. If using a 4+4 pin cable, you can separate the halves if your motherboard only has a 4-pin socket, or combine them for 8-pin sockets. Connect SATA power cables to any additional SATA SSDs or hard drives—the L-shaped connector only fits one way.
Leave PCIe GPU power cables disconnected until after installing the graphics card. Connect case fan cables to motherboard fan headers (SYS_FAN1, SYS_FAN2, etc.) or PSU peripheral connectors if fans use 4-pin Molex connectors. RGB controller cables connect to RGB headers on motherboards or included controllers—consult case and motherboard manuals for specific RGB connection diagrams.
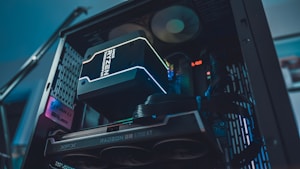
Step 10: Install Graphics Card (GPU)
Locate the PCIe x16 slot on your motherboard—usually the topmost long slot closest to the CPU. This slot provides maximum bandwidth for GPU performance. Remove the slot covers from the rear of your case corresponding to the GPU slots (typically 2-3 adjacent vertical metal brackets). Save one screw for securing the GPU later. Some cases use tool-less slot covers that snap out—these don't require screws for GPU installation.
Remove the GPU from its anti-static bag, handling it by the metal bracket and backplate edges. Avoid touching the gold PCIe contacts or cooling fans. If your GPU has a protective plug covering the PCIe connector, remove it. Some GPUs include a support bracket or anti-sag bracket—install this after the GPU if recommended by the manufacturer. Align the GPU's PCIe connector with the motherboard slot and metal bracket with the case rear opening.
Lower the GPU straight down into the PCIe slot with gentle even pressure. Push down until you hear a click as the slot's retention clip engages. The GPU should sit fully inserted with the bracket flush against the case rear. Secure the GPU's metal bracket to the case with one or two screws depending on GPU thickness (single or dual-slot). Connect the required PCIe power cables from your PSU to power connectors on the GPU—typically one or two 8-pin (6+2) connectors. Ensure cables click securely into place.
⚠️ GPU Installation Tip
Modern GPUs are heavy and can sag over time, potentially damaging the PCIe slot. Consider using a GPU support bracket or anti-sag mount included with your GPU or case. Alternatively, a simple DIY solution involves using LEGO structures or action figures to support the GPU's far end, preventing sag while adding personality to your build!
Step 11: Cable Management and Final Assembly
Connect all remaining case fans to motherboard fan headers or PSU power. Ensure all power cables are connected: 24-pin ATX motherboard, 8-pin CPU, GPU PCIe power, and SATA storage power. Verify all front panel connectors (USB, audio, power button, LEDs) are properly attached. Do a final visual inspection: Check CPU cooler fan spins freely without obstruction. Verify RAM sticks are fully seated with clips engaged. Confirm GPU is secured to case bracket. Ensure no loose screws or debris remain in case.
Step 12: First Power-On and BIOS Setup
Before closing case panels, perform a test boot to verify everything works. Connect your power cable to the PSU and power outlet, keyboard to a USB port, and monitor to GPU video outputs (never motherboard video—use GPU ports). Flip the PSU power switch to "I" (on position) on the PSU's rear. The case power LED may illuminate depending on design. Press the case power button and watch for signs of life: CPU cooler fan spinning, case fans spinning, motherboard RGB lighting if present, and GPU fans spinning (modern GPUs may not spin fans at idle).
If fans spin but display shows nothing, wait 30-60 seconds as the system may be training memory. First boots often take longer than subsequent boots. If the system posts successfully, you'll see the motherboard manufacturer's logo followed by BIOS splash screen. Press the DELETE key (or F2, depending on motherboard) repeatedly during boot to enter BIOS setup utility. Verify all components are detected: CPU model and temperature, RAM capacity and speed, and storage drives listed.
In BIOS, navigate to the AI Tweaker/OC menu and enable XMP (Intel) or EXPO (AMD) profile for RAM to run at advertised speeds rather than default 4800MHz. Select XMP Profile 1 or EXPO Profile 1 from dropdown menus. Save changes and exit (usually F10 key). The system will reboot automatically applying the new settings. Modern motherboards often enable XMP automatically, but verification ensures proper configuration.
💡 Pro Tip: Troubleshooting No-Post Issues
If your PC doesn't power on, check: PSU power switch position, PSU cable fully inserted into wall outlet and PSU, 24-pin and 8-pin CPU power cables connected, RAM fully seated (listen for click), and GPU power cables connected if using dedicated GPU. If fans spin but no display, try reseating RAM—remove and reinstall firmly until clips engage. Many "build issues" result from improperly seated RAM.
Installing Windows 11 and Drivers

Enter your Windows product key when prompted or select "I don't have a product key" to activate later. Choose Windows 11 Home or Pro edition matching your purchased license. Accept licensing terms, select "Custom: Install Windows only (advanced)" installation type, and select your primary SSD as the installation destination. Click "Next" to begin Windows installation—this takes 10-15 minutes. The system will restart several times automatically during installation.
Complete the out-of-box experience (OOBE) setup: connect to WiFi/Ethernet, sign in with Microsoft account (or create local account using workarounds), configure privacy settings (minimum recommendations suggested for privacy), and skip optional services like OneDrive cloud backup initially. Windows 11 will download and install updates automatically on first connection—this process can take 30-60 minutes depending on connection speed and number of accumulated updates since Windows installation media creation.
Driver Installation Priority
After Windows installation completes, install critical drivers in this order: First, install chipset drivers from motherboard manufacturer's support website—these enable proper communication between Windows and motherboard components. Second, install GPU drivers from NVIDIA or AMD directly (GeForce Experience for NVIDIA, AMD Software Adrenalin for AMD). Third, install audio drivers if motherboard manufacturer provides updated versions beyond Windows defaults. Fourth, update network drivers if experiencing connectivity issues.
Visit your motherboard manufacturer's support page, locate your exact model, and download the latest Windows 11 drivers. Most manufacturers provide combined driver packages or individual downloads for chipset, audio, networking, and RGB control software. For GPU drivers, download GeForce Experience (NVIDIA) or AMD Software Adrenalin (AMD) and let these applications manage driver updates automatically. Avoid third-party driver updater software—these often cause more problems than they solve.
Final Steps and Testing
Install your preferred web browser, gaming platform clients (Steam, Epic Games Store, GOG Galaxy, Xbox app), and essential software (Discord, monitoring tools, etc.). Download and run CPU-Z and GPU-Z free utilities to verify all components running at correct speeds and voltages. Run a stress test using Cinebench for CPU validation or 3DMark Time Spy for combined CPU/GPU testing—watch temperatures remain in safe ranges (CPUs under 85°C, GPUs under 83°C under load).
Install your first game and test performance! Monitor frame rates using built-in game overlays or MSI Afterburner. Enable any display features like G-Sync (NVIDIA) or FreeSync (AMD) in both GPU driver software and monitor settings for tear-free gaming. Configure Windows Game Mode settings, disable unnecessary startup applications in Task Manager, and organize desktop for easy access to frequently-played games. Congratulations—you've successfully built your gaming PC!
Essential Software for New Gaming PCs
- Steam / Epic Games Store / GOG: Primary game distribution platforms
- GeForce Experience / AMD Adrenalin: GPU driver updates and optimization
- Discord: Voice chat and gaming communities
- HWiNFO64: Comprehensive hardware monitoring and sensor reporting
- MSI Afterburner: GPU overclocking and performance overlay
- 7-Zip or WinRAR alternatives: File compression (NanaZip recommended free alternative)
- VLC Media Player: Universal media playback
- OBS Studio: Game recording and streaming
Common Issues and Solutions
No display output: Ensure monitor cable connects to GPU outputs, not motherboard. Verify RAM fully seated—reseat if necessary. Check all power cables properly connected. Try removing and reinstalling GPU. Test with one RAM stick in slot A2.
System powers on then immediately off: Usually indicates power delivery issues. Check 8-pin CPU power cable connected. Verify PSU capacity sufficient for components. Test outside case to eliminate short-circuit from standoff misplacement.
BIOS doesn't detect storage drive: Ensure SATA data and power cables connected properly. For M.2 drives, verify proper insertion and secure screw. Some M.2 slots share bandwidth with SATA ports—check manual for conflicts. Try different M.2 slot or SATA port.
Overheating issues: Verify CPU cooler properly mounted with even pressure. Check cooler fan spins and connects to CPU_FAN header. Confirm thermal paste applied. Ensure case fans oriented correctly (front intake, rear/top exhaust). Remove case front panel temporarily to test if airflow restricted.
💡 Pro Tips for Long-Term Maintenance
Clean dust filters monthly to maintain airflow. Reapply thermal paste every 2-3 years. Update GPU drivers for new game releases. Keep Windows updated for security patches. Monitor temperatures during gaming—sudden increases may indicate cooling issues. Maintain positive case pressure (more intake than exhaust fans) to reduce dust accumulation.
 Windows 11 provides a solid gaming foundation out-of-the-box, but numerous optimizations can extract additional performance, reduce input latency, and eliminate background interruptions that impact gaming experiences. This comprehensive guide covers 21 optimization techniques that can increase frame rates by 10-20% without any hardware upgrades. From basic settings every gamer should configure to advanced tweaks for enthusiasts, these optimizations work for all gaming systems from budget to high-end rigs. Most changes take only minutes to implement and require no technical expertise beyond following step-by-step instructions.
 Game Mode prioritizes gaming processes, allocates more CPU and GPU resources to games, and prevents Windows updates from installing during gameplay. Microsoft designed Game Mode specifically for gaming optimization, making it the single most important setting to enable. Game Mode usually enables by default on Windows 11, but verification ensures proper configuration.
 Windows power plans control CPU clock speeds, screen brightness, and sleep timing. The default "Balanced" plan reduces CPU performance during light usage for energy savings. High Performance plan maintains maximum CPU clock speeds continuously, eliminating performance throttling during gaming. Desktop PCs should use High Performance unconditionally, while laptop users balance performance against battery life.
 DirectStorage revolutionizes game loading by allowing games to load assets directly from NVMe SSDs to GPU VRAM, bypassing CPU decompression bottlenecks. This technology reduces load times from minutes to seconds in supported games and enables more detailed open worlds with richer textures. DirectStorage requires NVMe SSD, Windows 11, and games with DirectStorage support.
 Windows Storage Sense automatically del