Complete Tech How-To Guides 2025
Master technology with our comprehensive step-by-step tutorials. Learn how to build a gaming PC from scratch, choose the perfect laptop for your needs, optimize Windows 11 for maximum performance, troubleshoot common tech problems, and become a tech expert with detailed guides, images, and expert tips for beginners and advanced users.
📚 Browse How-To Categories
How to Build a Gaming PC
Complete step-by-step guide to building your first gaming PC. Learn component selection, assembly process, BIOS configuration, and Windows installation with budget builds from ₹50,000 to ₹3,00,000+.
How to Choose the Perfect Laptop
Expert guide to selecting the right laptop for students, professionals, gamers, and content creators. Understand processors, RAM, storage, display quality, battery life, and avoid common buying mistakes.
Speed Up Windows 11 Performance
10 essential tricks to optimize Windows 11 for faster boot times, improved responsiveness, and better gaming performance. Includes debloating, startup optimization, and power settings configuration.
🖥️ How to Build a Gaming PC: Complete 2025 Guide
Building your own gaming PC is more accessible and rewarding than ever in 2025. This comprehensive guide walks you through every step from component selection to final boot-up, helping you create a custom system perfectly tailored to your budget and gaming needs. Whether you're building a ₹50,000 budget PC or a ₹3,00,000 high-end rig, this guide covers everything you need to know.
🔧 Tools You'll Need:
- Phillips head screwdriver (magnetic tip recommended)
- Anti-static wrist strap (optional but recommended)
- Cable ties or velcro straps for cable management
- Thermal paste (usually pre-applied on CPU coolers)
- USB drive (8GB+) for Windows installation
- Well-lit workspace with ample room
Understanding PC Components
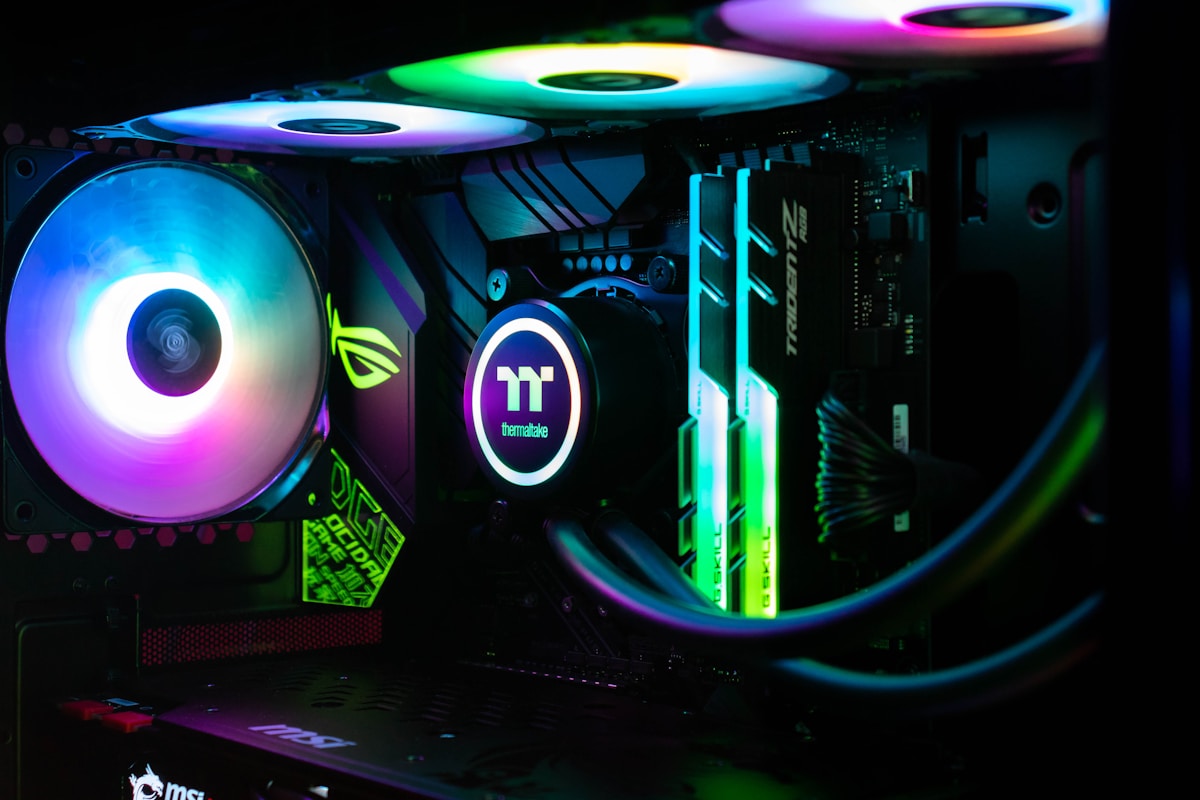
Before building, you need to understand the nine essential components: CPU (processor) - the brain handling all calculations, GPU (graphics card) - the most important component for gaming rendering visuals, Motherboard - the main circuit board connecting all components, RAM (memory) - temporary storage for active programs (minimum 16GB for gaming), Storage - SSD for fast loading (1TB recommended), PSU (power supply) - delivers electricity to all components (600W minimum for gaming), CPU Cooler - keeps processor cool under load, Case - houses all components with airflow, and Operating System - Windows 11 for gaming.
Start by setting your budget and identifying your gaming goals (1080p 60fps, 1440p 144fps, or 4K gaming). For 2025, budget builds (₹50,000-₹80,000) should target Intel Core i5-14400F or AMD Ryzen 5 7600 paired with Nvidia RTX 4060 or AMD RX 7600. Mid-range builds (₹1,00,000-₹1,50,000) benefit from Intel Core i7-14700K or AMD Ryzen 7 7800X3D with RTX 4070 Super. High-end builds (₹2,00,000+) use Intel Core i9-14900K or AMD Ryzen 9 7950X3D with RTX 5080/5090.
Ensure compatibility using PCPartPicker.com which automatically checks motherboard socket type, RAM compatibility (DDR4 vs DDR5), case size (ATX, Micro-ATX, Mini-ITX), PSU wattage requirements, and BIOS version for newer CPUs. Always verify your motherboard supports your CPU generation and RAM type before purchasing.
Clear a large, clean workspace with good lighting. Avoid carpeted areas that generate static electricity. Unbox all components carefully and verify everything arrived undamaged. Read motherboard manual thoroughly as it contains crucial installation diagrams. Ground yourself by touching a metal object before handling components or wear an anti-static wrist strap connected to your case. Keep component boxes for warranty purposes.
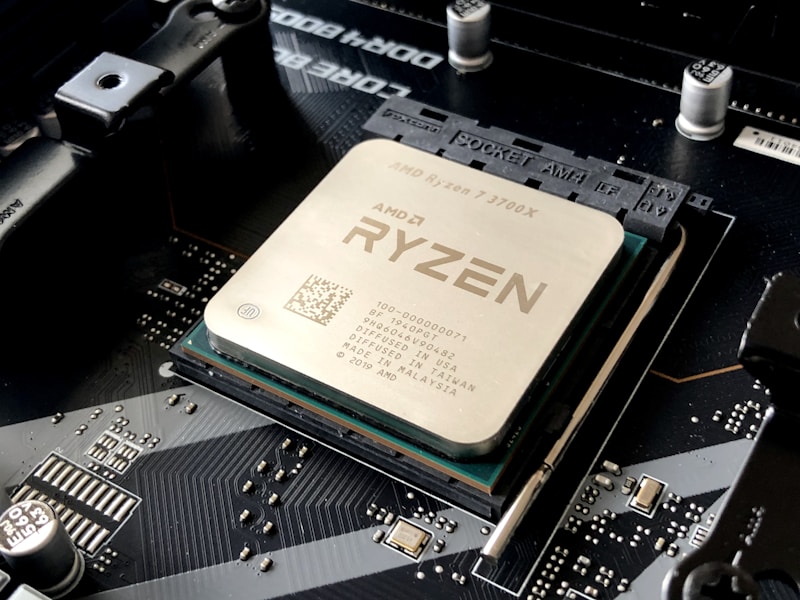
Place motherboard on its box (anti-static surface). For Intel CPUs, lift the metal retention arm, align CPU with socket (gold triangle matches socket triangle), gently place CPU (no force needed), and lower retention arm. For AMD CPUs, lift retention arm, align gold triangle, drop CPU into socket (it should fall into place), and secure arm. Never touch CPU pins or socket contacts. This is the most delicate step requiring careful handling.
If using stock cooler (included with CPU), verify thermal paste is pre-applied (gray square on cooler base). If using aftermarket cooler, apply pea-sized amount of thermal paste to CPU center. For tower air coolers, attach mounting brackets to motherboard following manual, position cooler over CPU, secure with screws in X-pattern (tightening gradually), and connect fan cable to CPU_FAN header on motherboard. For AIO liquid coolers, install radiator and fans to case first, then mount pump block to CPU with thermal paste.
Consult motherboard manual for correct RAM slots (usually slots 2 and 4 for two sticks). Push down both retention clips on RAM slot ends. Align RAM notch with socket key (offset position prevents backward installation). Place RAM stick and press down firmly with both thumbs until retention clips snap into place with audible click. Never touch gold contacts. For optimal performance, install RAM in matching pairs using correct slots for dual-channel operation.
Locate M.2 slot on motherboard (usually near CPU, check manual). Remove tiny mounting screw at end of slot. Insert M.2 SSD at 30-degree angle into slot, push firmly until seated, then press down and secure with screw. Some motherboards include M.2 heatsinks - attach these for better thermal performance. Modern motherboards support PCIe 4.0 and 5.0 SSDs offering 7,000+ MB/s read speeds for lightning-fast game loading and OS boot times under 10 seconds.
Remove both side panels (usually thumbscrews or regular screws). Install motherboard I/O shield (metal plate) into rectangular opening at case rear by pressing firmly until clips snap. Install case fans if not pre-installed (front fans intake, rear/top fans exhaust for positive airflow). Plan cable routing paths through case's cable management holes. Modern cases include PSU shroud hiding cables for clean aesthetic.
Install motherboard standoffs (brass spacers) into case mounting holes matching your motherboard size (ATX, Micro-ATX, or Mini-ITX). Carefully lower motherboard into case, aligning I/O ports with I/O shield and screw holes with standoffs. Insert screws through motherboard holes into standoffs, tightening in star pattern (don't overtighten). Ensure motherboard isn't touching case metal anywhere except standoffs to prevent short circuits.
Position PSU in case (fan facing down toward vent for intake, or up if no bottom vent). Secure with four screws from outside case. For modular PSUs, connect only needed cables: 24-pin ATX motherboard power, 8-pin CPU power (top-left of motherboard), PCIe power cables for GPU (6+2 pin), and SATA power for additional drives. Use PSU's included cables only - never mix cables from different PSU brands which can damage components.
Remove PCIe slot covers from case rear for GPU exhaust (usually 2-3 slots). Locate topmost PCIe x16 slot (longest slot, usually first from top). Press down release tab on slot's right side. Align GPU with slot and PCIe covers, push down firmly until you hear click and retention tab snaps up. Secure GPU to case with screws through bracket. Connect PCIe power cables from PSU to GPU (RTX 4070+ requires one or two 8-pin cables, RTX 5080/5090 use new 12VHPWR connector). Ensure GPU power cables fully seated with click.
Connect case's front panel cables to motherboard headers (refer to motherboard manual for locations): Power button, Reset button, Power LED, HDD LED (small 2-pin connectors), USB 3.0 header (large blue 19-pin), USB-C header (if case has USB-C), HD Audio header for headphone/mic jacks. These tiny connectors can be fiddly - use good lighting and reference manual diagrams. Some motherboards include adapter for easier front panel cable installation.
Route cables through case's cable management holes and channels behind motherboard tray. Use cable ties to bundle and secure cables neatly. Ensure no cables block fans or contact hot components like GPU. Do final verification: all power cables connected and firmly seated (24-pin ATX, 8-pin CPU, GPU power), RAM clicked in, GPU secured with screws, all fans connected (CPU fan to CPU_FAN, case fans to SYS_FAN or fan hub). Double-check nothing loose inside case.
Connect monitor to GPU (not motherboard) using DisplayPort or HDMI cable. Connect keyboard, mouse, and power cable. Switch on PSU power switch (rear of PSU). Press case power button. If successful, you'll see motherboard logo and BIOS screen. Press Delete or F2 key to enter BIOS. Enable XMP/EXPO for RAM to run at advertised speed (crucial for performance). Verify all components detected (CPU, RAM amount, SSD). Save settings and exit. If PC doesn't boot, check power connections first, then reseat RAM.
Download Windows 11 Media Creation Tool from Microsoft website on another PC. Create bootable USB drive (8GB minimum, all data will be erased). Insert USB into new PC and boot. Follow Windows installation wizard: select language, enter product key (or skip for now), choose Custom installation, select your SSD, and begin installation. Windows will restart several times. After installation, run Windows Update repeatedly until no updates remain. Install motherboard chipset drivers from manufacturer website, then GPU drivers from Nvidia or AMD website.
Install all drivers in order: Chipset drivers first (from motherboard manufacturer), GPU drivers (Nvidia GeForce Experience or AMD Software), audio drivers, LAN/WiFi drivers if needed. Download MSI Afterburner for GPU monitoring, HWiNFO64 for system sensors, and Cinebench R24 + 3DMark for performance testing. Run stress tests to verify stability: Prime95 for CPU (monitor temperatures - should stay below 85°C), FurMark or 3DMark for GPU (below 80°C ideal). High temperatures indicate improper cooler installation or inadequate case airflow.
Common PC Building Mistakes to Avoid
- Forgetting I/O Shield: Install before motherboard or you'll need to disassemble everything
- Not Connecting CPU Power: 8-pin CPU power cable is separate from 24-pin ATX cable
- Plugging Monitor into Motherboard: With dedicated GPU, always connect to GPU ports
- Overtightening Screws: Finger-tight plus quarter turn is sufficient for most screws
- Installing RAM in Wrong Slots: Check manual for dual-channel configuration
- Forgetting to Enable XMP/EXPO: RAM runs at 2133MHz default without enabling profile
- Inadequate PSU Wattage: Calculate power requirements with 20% headroom minimum
- Poor Cable Management: Affects airflow and makes future upgrades difficult
Budget Gaming PC Builds 2025
Budget Build (₹55,000): Intel Core i5-12400F (₹12,000), MSI B660M Pro (₹8,500), 16GB DDR4 3200MHz (₹4,500), RTX 4060 8GB (₹25,000), 512GB NVMe SSD (₹3,500), 550W 80+ Bronze PSU (₹4,000), Budget ATX Case (₹3,000). Targets 1080p 60fps high settings.
Mid-Range Build (₹1,20,000): AMD Ryzen 7 7700X (₹28,000), MSI B650 Tomahawk (₹18,000), 32GB DDR5 6000MHz (₹12,000), RTX 4070 Super 12GB (₹54,000), 1TB Gen4 NVMe (₹8,000), 750W 80+ Gold (₹8,500), NZXT H510 Flow (₹7,000). Targets 1440p 144fps ultra settings.
High-End Build (₹2,50,000): Intel Core i7-14700K (₹38,000), ASUS ROG Strix Z790 (₹35,000), 32GB DDR5 7200MHz (₹18,000), RTX 5080 16GB (₹1,20,000), 2TB Gen4 NVMe (₹15,000), 850W 80+ Platinum (₹15,000), Lian Li O11 Dynamic (₹12,000). Targets 4K 60fps+ ultra settings with ray tracing.
💻 How to Choose the Perfect Laptop: Complete 2025 Guide
Selecting the right laptop requires understanding your specific needs, budget constraints, and technical specifications. This comprehensive guide helps you navigate the overwhelming laptop market to find your perfect match whether you're a student, professional, gamer, or content creator. With hundreds of models available from ₹30,000 to ₹3,00,000+, making the informed choice saves money and frustration.
Step 1: Identify Your Primary Use Case
Your laptop usage determines required specifications. Students need reliable battery life (8+ hours), comfortable keyboard, lightweight design (under 1.5kg), and sufficient performance for note-taking, research, and video calls - budget ₹40,000-₹80,000. Office Professionals prioritize excellent keyboard, business software compatibility, security features (fingerprint reader, TPM 2.0), and all-day battery - budget ₹60,000-₹1,20,000. Content Creators require color-accurate displays (100% sRGB minimum), powerful CPU (Core i7/Ryzen 7+), dedicated GPU, 32GB+ RAM, and fast SSD - budget ₹1,00,000-₹2,50,000. Gamers need high-refresh displays (144Hz+), powerful GPU (RTX 4060+), good cooling, and don't mind weight or battery life - budget ₹80,000-₹2,00,000.
Step 2: Set Realistic Budget
Laptop pricing correlates directly with performance and build quality. Budget Laptops (₹30,000-₹50,000) offer basic performance with Celeron/Pentium processors, 4-8GB RAM, 256GB SSD, and plastic build - suitable for web browsing and light productivity only. Mid-Range Laptops (₹50,000-₹80,000) provide good value with Core i5/Ryzen 5, 16GB RAM, 512GB SSD, aluminum chassis - handles most tasks smoothly. Premium Laptops (₹80,000-₹1,50,000) deliver excellent performance with Core i7/Ryzen 7, 16GB+ RAM, quality displays, and premium materials. High-End/Specialized (₹1,50,000+) includes gaming laptops with RTX GPUs, workstation laptops with professional graphics, and ultrabooks with cutting-edge specs.
Step 3: Understanding Processor (CPU)
For 2025, prioritize Intel Core Ultra 200V series (Lunar Lake) for exceptional efficiency and 15+ hour battery life in ultrabooks. Intel Core Ultra 100H series (Meteor Lake) balances performance and efficiency for mainstream laptops. AMD Ryzen AI 300 series offers competitive performance with excellent integrated graphics and value pricing. Avoid Intel Core i3 and AMD Ryzen 3 processors for new laptops - they struggle with modern multitasking. For productivity work, Core i5/Ryzen 5 minimum recommended. For content creation and gaming, Core i7/Ryzen 7 or higher required. Check generation number: 14th Gen Intel or Ryzen 7000/8000 series minimum for 2025 purchases.
Step 4: RAM Requirements
RAM directly affects multitasking capability and future-proofing. 8GB RAM is absolute minimum for Windows 11, handles basic tasks but struggles with browser tabs, Discord, and background apps simultaneously - avoid if possible. 16GB RAM is sweet spot for most users, smoothly runs Office, Chrome with 20+ tabs, video calls, Photoshop, light video editing, and gaming. 32GB RAM benefits content creators running Premiere Pro, After Effects, 3D modeling, virtual machines, and heavy multitasking. 64GB+ RAM only necessary for professional workstation tasks like 8K video editing or large dataset processing. Ensure RAM is upgradeable if buying 8GB model - many thin laptops have soldered RAM that cannot be upgraded later.
Step 5: Storage Selection
Always choose SSD over HDD in 2025 - SSDs are 10x faster, silent, durable, and energy-efficient. 256GB SSD is bare minimum, fills quickly with Windows, apps, and files - only acceptable for cloud-storage-heavy users. 512GB SSD is recommended minimum for most users, provides comfortable space for OS, applications, games, and media. 1TB SSD ideal for content creators, gamers with large game libraries, and those storing videos/photos locally. 2TB+ SSD for professionals with massive media libraries. Check if laptop has additional M.2 slot for future SSD upgrades - many models support adding second SSD. PCIe Gen 4 NVMe SSDs (standard in 2025) offer 5,000-7,000 MB/s speeds for near-instant application launches.
Step 6: Display Quality Assessment
Display is critical for user experience and eye comfort. Resolution: 1920x1080 (Full HD) minimum for 14-15 inch laptops, 2560x1440 (QHD) or 2880x1800 for premium 14-16 inch models, 3840x2160 (4K) only beneficial for 17+ inch screens or creative work. Panel Type: IPS LCD offers good colors and viewing angles (standard), OLED provides infinite contrast and vibrant colors but costs more and risks burn-in with static images. Color Gamut: Verify 100% sRGB minimum (avoid 45% NTSC displays common in budget laptops), 100% DCI-P3 for content creation. Brightness: 300 nits minimum for indoor use, 400+ nits for outdoor visibility, 500+ nits for HDR content. Refresh Rate: 60Hz standard for productivity, 120Hz reduces eye strain, 144-165Hz essential for gaming.
Step 7: Battery Life Evaluation
Check battery capacity in watt-hours (Wh), not just manufacturer claims. 40-50Wh batteries in thin laptops provide 4-6 hours light use. 56-65Wh batteries deliver 6-9 hours for mainstream laptops. 75-90Wh batteries offer 10-15+ hours in efficiency-focused ultrabooks with Intel Core Ultra or AMD Ryzen AI processors. Gaming laptops with 70Wh+ batteries still only manage 4-6 hours when not gaming due to power-hungry components. New Snapdragon X Elite laptops (Dell XPS 13, Microsoft Surface) achieve 18-20+ hours due to ARM processor efficiency. Read professional reviews for real-world battery testing rather than trusting manufacturer specifications which use unrealistic scenarios.
Step 8: Build Quality & Portability
Materials: Aluminum chassis offers premium feel, durability, and better heat dissipation than plastic - worth extra cost for daily carry laptops. Magnesium alloy provides aluminum strength with lighter weight. Carbon fiber (found in ThinkPad X1 Carbon) is strongest and lightest but expensive. Weight: Under 1.3kg ultra-portable for constant travel, 1.3-1.8kg mainstream portable, 1.8-2.5kg acceptable for desk/bag use, 2.5kg+ gaming/workstation laptops for stationary use. Durability: Look for MIL-STD-810H military testing (found in ThinkPads, Dell Latitudes) ensuring drop, shock, and extreme temperature resistance. Keyboard: Test key travel (1.3mm+ preferred), spacing, and backlight before buying - you'll type millions of keystrokes.
Step 9: Connectivity & Ports
Essential ports: USB Type-C with Thunderbolt 4 for fast data transfer (40Gbps), external displays, and charging - minimum two ports. USB Type-A 3.2 for legacy devices (mice, keyboards, flash drives). HDMI 2.1 for monitors and presentations. 3.5mm headphone jack for wired audio. SD card reader beneficial for photographers. Ethernet port for stable wired internet (found in business laptops). Security lock slot for physical theft prevention. Modern ultrabooks sacrifice ports for thinness - budget for USB-C hub ($30-$100) with HDMI, USB-A, SD card, and Ethernet. Verify if USB-C ports support charging and DisplayPort for monitor connections.
Step 10: Research Brand Reputation & Support
Excellent Support: Dell (especially business line), Lenovo ThinkPad series, Apple MacBooks - offer fast repairs, multiple service centers, responsive customer service. Good Support: HP business laptops, ASUS mainstream models - decent service but slower response times. Average Support: Acer, MSI gaming laptops - limited service centers, mixed customer experiences. Variable Support: Budget brands like Avita, iBall - minimal support infrastructure, repair delays common. Check warranty terms: minimum 1-year standard warranty, consider 3-year extended warranty for expensive laptops (₹5,000-₹15,000 adds significant value). Accidental damage protection (ADP) worthwhile for mobile laptops (₹8,000-₹20,000). Read owner reviews on service experience before purchase.
Top Laptop Recommendations by Category 2025
Best Overall: MacBook Air M4 13" (₹82,900) - exceptional M4 performance, 15+ hour battery, premium build, perfect for most users.
Best Windows Ultrabook: Asus Zenbook 14 OLED (₹82,490) - stunning OLED display, 15+ hour battery, Core Ultra processor.
Best Budget: Acer Swift Go 14 (₹61,732) - excellent value with Core Ultra 7, aluminum build, solid performance.
Best Gaming: HP Victus 16 (₹89,990) - RTX 4050 graphics, 144Hz display, excellent gaming value under ₹90,000.
Best Business: Asus ExpertBook P5 (₹1,06,452) - 144Hz display, 14+ hour battery, comprehensive security, TPM 2.0.
Best 2-in-1: HP Spectre x360 14 (₹1,35,000) - convertible design, OLED touchscreen, premium stylus support.
⚙️ How to Speed Up Windows 11: 10 Essential Optimization Tips
Windows 11 can slow down over time due to accumulated bloatware, background processes, outdated drivers, and suboptimal settings. These 10 essential optimization tricks restore speed and responsiveness, reducing boot times from 60+ seconds to under 20 seconds and improving overall system performance by 30-50%. These tweaks work on both new and aging systems.
Startup programs dramatically increase boot time and consume RAM constantly. Press Ctrl + Shift + Esc to open Task Manager, click "Startup" tab, and disable apps you don't need immediately on boot. Common culprits: Spotify, Discord, Steam, Adobe Creative Cloud, Microsoft Teams, OneDrive (unless actively used). Only keep essential security software (antivirus), RGB control software if needed, and drivers. This single change can reduce boot time by 20-40 seconds and free up 500MB-2GB RAM.
Storage Sense automatically deletes temporary files, downloads, and Recycle Bin items. Go to Settings > System > Storage > Storage Sense, toggle ON, and configure: Run Storage Sense "Every week", Delete temporary files "14 days after being used", Empty Recycle Bin "30 days after files were deleted", Delete files in Downloads "Never" (manual review recommended). This prevents disk clutter accumulating and maintains optimal SSD performance. Manually run "Clean Now" to immediately free 5-20GB space.
Default "Balanced" power mode limits CPU performance to save energy. Go to Settings > System > Power & Battery > Power Mode, select "Best Performance" (desktop) or "High Performance" (laptop when plugged in). For advanced control: open Control Panel > Hardware and Sound > Power Options > Show additional plans > High Performance. Under "Change plan settings" > "Change advanced power settings", set Processor power management Minimum to 100%, PCI Express Link State to OFF, and Hard disk turn off to Never. Laptops on battery should use Balanced mode to preserve runtime.
Outdated drivers cause performance issues, crashes, and security vulnerabilities. Update in this order: 1) GPU drivers first (Nvidia GeForce Experience or AMD Software - 10-15% gaming performance improvement), 2) Chipset drivers from motherboard manufacturer website (critical for CPU and RAM performance), 3) Windows Update for remaining drivers. Manually check Device Manager for devices with yellow exclamation marks indicating missing drivers. Update network adapter drivers for WiFi/Ethernet stability. Audio drivers fix sound issues. USB drivers improve peripheral performance. Schedule monthly driver updates.
Windows 11 includes dozens of pre-installed apps consuming storage and RAM. Go to Settings > Apps > Installed apps, sort by Size, and uninstall: Xbox apps (if not gaming), Cortana, Mail and Calendar (use web version or Outlook), Microsoft Teams personal, Solitaire Collection, Movies & TV, Groove Music, 3D Viewer, Mixed Reality Portal, Weather, News. For advanced debloating, use Win11Debloat PowerShell script (Jeffrey Raphire) which disables telemetry, removes Bing from Start Menu, uninstalls bloatware, and configures privacy settings. Create system restore point before running scripts.
Windows visual effects consume CPU and GPU resources. Type "sysdm.cpl" in Windows Search, open System Properties > Advanced tab > Performance Settings > Visual Effects tab. Select "Adjust for best performance" to disable all effects, or "Custom" to selectively disable: Animate windows when minimizing and maximizing, Animations in the taskbar, Fade or slide menus into view, Show shadows under windows. Keep enabled: "Show thumbnails instead of icons" and "Smooth edges of screen fonts" for usability. This improves responsiveness on older PCs by 20-30%.
SSDs require TRIM command (automatic in Windows 11) to maintain performance - verify enabled by typing "cmd" in Search, right-click Command Prompt > Run as administrator, type "fsutil behavior query DisableDeleteNotify" - result "0" means TRIM enabled. Disable scheduled defragmentation for SSDs (unnecessary and reduces lifespan): search "Defragment and Optimize Drives", select SSD, click "Change settings", uncheck "Run on a schedule". For HDDs (mechanical drives), keep weekly defragmentation enabled. Check SSD health quarterly using CrystalDiskInfo software.
Background apps consume RAM and send usage data to Microsoft. Go to Settings > Privacy & Security > Background apps, toggle OFF for apps you don't need running constantly. Disable Windows telemetry: Settings > Privacy & Security > Diagnostics & feedback > Diagnostic data > select "Send required diagnostic data only" (minimum setting). Disable activity tracking: Settings > Privacy & Security > Activity history > uncheck "Store my activity history on this device". This frees 200-500MB RAM and improves privacy.
If software optimization insufficient, hardware upgrades deliver dramatic improvements. SSD Upgrade: Replace old SATA SSD with NVMe Gen4 SSD (5,000-7,000 MB/s) for 60% faster loading - clone old drive using Samsung Data Migration or Macrium Reflect software. Add second M.2 SSD if motherboard has additional slot. RAM Upgrade: 8GB to 16GB upgrade costs ₹4,000-₹6,000 and transforms multitasking capability. Check current RAM: Task Manager > Performance > Memory. Buy matching RAM speed (DDR4-3200 or DDR5-5600). Ensure dual-channel configuration (2 sticks in correct slots) for best performance.
For severely degraded systems, clean Windows installation delivers best results. Backup important files to external drive or cloud. Download Windows 11 Media Creation Tool from Microsoft website. Create bootable USB (8GB minimum). Boot from USB, select "Custom install", delete all partitions (WARNING: erases everything), and install fresh Windows. After installation: run Windows Update until complete, install chipset drivers, GPU drivers, then other drivers. Reinstall applications selectively - avoid bloatware. Fresh installation often improves performance by 50-100% compared to years-old Windows installation with accumulated junk.
🔧 Common Tech Problems & Solutions
PC Won't Boot / Black Screen Issues
Symptoms: Press power button, fans spin but no display output or no response at all.
Solutions: 1) Verify monitor cable connected to GPU (not motherboard), 2) Reseat RAM by removing and firmly reinstalling until clicks, 3) Check 24-pin ATX and 8-pin CPU power cables fully seated, 4) Try one RAM stick in different slots to isolate bad RAM, 5) Reset CMOS by removing motherboard battery for 30 seconds, 6) Disconnect all peripherals except keyboard, mouse, monitor, 7) Test with integrated graphics (remove GPU, connect to motherboard if CPU has iGPU). If still not working, likely faulty motherboard or PSU requiring replacement.
Laptop Overheating & Thermal Throttling
Symptoms: Fan running constantly, hot to touch, performance drops during gaming/heavy tasks, unexpected shutdowns.
Solutions: 1) Clean air vents and fans using compressed air (power off first), 2) Ensure laptop on hard surface (not bed/blanket blocking airflow), 3) Use laptop cooling pad (₹800-₹2,000 - reduces temperatures 5-10°C), 4) Repaste CPU/GPU with quality thermal paste (requires disassembly - watch YouTube guides or professional service ₹1,500-₹3,000), 5) Undervolt CPU using ThrottleStop or Intel XTU (reduces heat 10-15°C without performance loss), 6) Lower in-game graphics settings or frame rate cap to reduce GPU load, 7) Replace thermal pads if laptop 3+ years old. Gaming laptops normally reach 80-90°C under load - concerning if exceeding 95°C or throttling below base clock speeds.
Blue Screen of Death (BSOD) Errors
Common Causes: Driver conflicts, RAM errors, corrupted Windows files, overclocking instability, hardware failure.
Solutions: 1) Note error code (e.g., SYSTEM_SERVICE_EXCEPTION, DRIVER_IRQL_NOT_LESS_OR_EQUAL), 2) Boot into Safe Mode (Settings > Recovery > Advanced startup > Troubleshoot > Startup Settings > Restart > press F4), 3) Uninstall recently installed drivers or programs, 4) Run Windows Memory Diagnostic (search in Windows) to test RAM overnight, 5) Update all drivers especially GPU and chipset, 6) Run "sfc /scannow" in Command Prompt as admin to repair corrupted system files, 7) Reset BIOS to defaults if overclocked, 8) Check Event Viewer (search in Windows) > Windows Logs > System for error details. Persistent BSODs indicate hardware failure requiring testing with spare components.
Slow Internet / WiFi Connectivity Issues
Symptoms: Slow download speeds, frequent disconnections, high ping in games, websites not loading.
Solutions: 1) Restart router and modem (unplug 30 seconds, reconnect), 2) Move closer to router or use 5GHz band instead of 2.4GHz for faster speeds, 3) Update WiFi adapter drivers from laptop manufacturer website, 4) Change WiFi channel in router settings to less congested channel (use WiFi Analyzer app), 5) Disable VPN if enabled (reduces speed 20-50%), 6) Run Windows Network Troubleshooter (Settings > Network & Internet > Status > Network troubleshooter), 7) Reset network settings (Settings > Network & Internet > Advanced network settings > Network reset), 8) For persistent issues, use wired Ethernet connection (10x more stable than WiFi for gaming/streaming). Upgrade router if 5+ years old (newer WiFi 6/6E routers deliver 30% better speeds).
Application Crashes & Freezing
Symptoms: Programs close unexpectedly, "Not Responding" messages, system freezes requiring restart.
Solutions: 1) Update application to latest version, 2) Run application as administrator (right-click > Run as administrator), 3) Check if application compatible with Windows 11 (older programs may need compatibility mode), 4) Verify sufficient free disk space (minimum 10% SSD capacity free), 5) Close background applications consuming RAM, 6) Disable antivirus temporarily to test if causing conflict, 7) Reinstall application completely (uninstall, delete leftover files in AppData folder, fresh install), 8) Check Event Viewer for application error logs with specific error codes. For games: update GPU drivers, verify game files in Steam/Epic, disable overlays (Discord, GeForce Experience).
🔍 Popular Tech How-To Searches 2025
PC Building Searches: how to build gaming PC 2025, PC building guide for beginners, how to install CPU, how to install RAM, how to install graphics card, PC assembly tutorial, BIOS setup guide, Windows installation steps, cable management guide, thermal paste application
Laptop Searches: how to choose laptop 2025, laptop buying guide India, best laptop for students, gaming laptop vs normal laptop, how much RAM needed, SSD vs HDD difference, laptop display types explained, battery life tips, laptop overheating fix
Windows Optimization: how to speed up Windows 11, make Windows faster, reduce boot time, disable startup programs, clean install Windows 11, optimize SSD Windows, improve gaming performance Windows, debloat Windows 11, disable telemetry
Troubleshooting Searches: PC won't boot black screen, laptop overheating solutions, blue screen error fix, WiFi not working Windows 11, application keeps crashing, how to fix slow computer, RAM not detected, GPU not working, driver installation problems
Component Installation: how to install M.2 SSD, upgrade laptop RAM, replace laptop battery, clean laptop fans, apply thermal paste, install WiFi card, upgrade PC power supply, install CPU cooler, replace graphics card
Software Guides: how to update graphics drivers, install chipset drivers, activate Windows 11, create bootable USB, partition hard drive, clone SSD to SSD, backup Windows, restore system, safe mode Windows 11
Need More Help with Your Tech?
Explore our complete library of tech tutorials, product reviews, and buying guides
Browse All Guides